Hi Dave,
a guy on Rodsnsods moved the shifter location forward on a ford type9 box. With no alternative tail housings he cut the bit off that the shifter bolts to, removed a section in front of it and welded the shifter bit back on. That just left shortening the selector shaft which was the easy bit. Maybe it'll help with another way to do what you need.
Neil.
Dave999's Aussie Charger
Moderator: Moderators
-
ScottyDave
- Posts: 1681
- Joined: Sun Mar 08, 15 9:38 pm
- Location: Dave Evans: MMA 130, Worcestershire
Re: Dave999's Aussie Charger
it sounds difficult but if you look at the pics of the tail housing it's quite straightforward. the selector rod goes into the front of the tail housing through what is effectively a tube then poking out of that tube where the gear stick goes. you're just shortening the tube (and the rod of course). it's only metal 

Re: Dave999's Aussie Charger
thats part of the plan
the single rail shifter tube will probably have to come off
my current box has an open shift rail a bolt on "honey pot" shifter housing and a big kink down in the shift rail
1st attempt will be to emulate that set up if that doesn't work the cutting disk will be put to harder work taking a shifter housing off a tail shaft housing and making a bracket.
Dave
The Greater Knapweed near the Mugwort by the Buckthorn tree is dying
Re: Dave999's Aussie Charger
did a bit of MSD fiddling
had one from Dunc that was busted for a long time, sorry dunc
i have had 3 goes at this now and no further forward
attached pictures of the 2 general type s (older and cheaper, newer more features and more expensive)
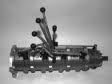
standard MSD 6AL these have discrete components, are assembled by hand and although i would never say easy to repair, when they go wrong the bit that dies usually burns up. there is evidence of failure or there is none and it is one of the components near the fat red cable. those components look like resistors and diodes but are in fact fuses in disguise.
method usually involves following the voltage from the end of the fat lead to the point where it stops and replacing the fuse with either another fuse or a bit of thin fuse wire.
after that powering it up the thing hums whistles and buzzes and you know its at least 50% better than it was
if it doesn't produce sparks replace all electrolytic capacitors (they dry out eventually when under the bonnet) and you'll be good again
the second picture is a more modern version. made in a factory where they got rid of their 60 or 70 skilled workers who could solder and replaced them with a few slightly more expensive people who can load and configure automated soldering stations.
a resistor on the old 6al is a good 5-7 mm long and looks like a resistor
a resistor on the new 6al is a small rectangular case with sliver caps at either end and the range from 1/2mm in size to 3 mm in size
trouble is diodes have the same case and so do small capacitors.
to make matters worse the whole board has been coated in a thick layer of plastic based varnish
and the power transistors and voltage regulators have had their labelling removed or were custom jobs, one has U52 on it and that is all
U52 is a 1950s valve or a motorola transistor that was made obsolete in the early 80s a year 2000-> MSD will not be using 70s transistors...
in summary without a magnifying glass/microscope and knowledge of the manufacturer of the parts its pretty impossible to work out much of what is going on.
one benefit of the modern MSD is that the fuses in these are genuine strips of fuse wire with a plastic braid right next to the fat red wire.
it would be obvious if they had gone
but the rest is pretty damned impossible to fault find. in order to check voltages the ends of your probes need to make contact with the ends of the component
easy when its wire leads, not so easy when the component is the same size as the tip of the probe, you don't know what is inside it and scraping the varnish off may well also scrape the component off
MSD don't want you to be able to fix this type.
i have a bunch of pictures to add but forgot my iphone lead today. i'll stick them on tonight
but in lieu of that 2 off the internet to illustrate the differences.
more later
had one from Dunc that was busted for a long time, sorry dunc
i have had 3 goes at this now and no further forward
attached pictures of the 2 general type s (older and cheaper, newer more features and more expensive)
standard MSD 6AL these have discrete components, are assembled by hand and although i would never say easy to repair, when they go wrong the bit that dies usually burns up. there is evidence of failure or there is none and it is one of the components near the fat red cable. those components look like resistors and diodes but are in fact fuses in disguise.
method usually involves following the voltage from the end of the fat lead to the point where it stops and replacing the fuse with either another fuse or a bit of thin fuse wire.
after that powering it up the thing hums whistles and buzzes and you know its at least 50% better than it was
if it doesn't produce sparks replace all electrolytic capacitors (they dry out eventually when under the bonnet) and you'll be good again
the second picture is a more modern version. made in a factory where they got rid of their 60 or 70 skilled workers who could solder and replaced them with a few slightly more expensive people who can load and configure automated soldering stations.
a resistor on the old 6al is a good 5-7 mm long and looks like a resistor
a resistor on the new 6al is a small rectangular case with sliver caps at either end and the range from 1/2mm in size to 3 mm in size
trouble is diodes have the same case and so do small capacitors.
to make matters worse the whole board has been coated in a thick layer of plastic based varnish
and the power transistors and voltage regulators have had their labelling removed or were custom jobs, one has U52 on it and that is all
U52 is a 1950s valve or a motorola transistor that was made obsolete in the early 80s a year 2000-> MSD will not be using 70s transistors...
in summary without a magnifying glass/microscope and knowledge of the manufacturer of the parts its pretty impossible to work out much of what is going on.
one benefit of the modern MSD is that the fuses in these are genuine strips of fuse wire with a plastic braid right next to the fat red wire.
it would be obvious if they had gone
but the rest is pretty damned impossible to fault find. in order to check voltages the ends of your probes need to make contact with the ends of the component
easy when its wire leads, not so easy when the component is the same size as the tip of the probe, you don't know what is inside it and scraping the varnish off may well also scrape the component off
MSD don't want you to be able to fix this type.
i have a bunch of pictures to add but forgot my iphone lead today. i'll stick them on tonight
but in lieu of that 2 off the internet to illustrate the differences.
more later
- Attachments
-
- older style. look resistors and capcitors and stuff
- MSD HI-6 Inside.jpg (45.98 KiB) Viewed 10696 times
-
- modern one with TINY tiny tiny components
- modern MSD 6al.jpg (62.52 KiB) Viewed 10696 times
The Greater Knapweed near the Mugwort by the Buckthorn tree is dying

Re: Dave999's Aussie Charger
Points are a bit easier then! 
Matt Hollingsworth - Vehicle Registrar
Panther Pink 73 Aussie Charger 265 Hemi 4 spd
Challenger Sam Posey Tribute car
Panther Pink 73 Aussie Charger 265 Hemi 4 spd
Challenger Sam Posey Tribute car
-
autofetish
- Posts: 5599
- Joined: Sat May 21, 11 6:43 am
Re: Dave999's Aussie Charger
The closer you are to death the more alive you are
Re: Dave999's Aussie Charger
yes

Dave
Dave
The Greater Knapweed near the Mugwort by the Buckthorn tree is dying
Re: Dave999's Aussie Charger
well
i haven't done anything for ages
finished off modification of the adaptor
it was chosen because it fits a t5 and has a bellhousing spigot that was small enough not to involve machine work/boring to the bellhousing hole breaking into the clutch fork mounting holes. because of that it misses one of the ballousing mounting holes.
at $150 it was worth it compared to the £300 to get one made here
3 bolts may well have been ok but i put 2 more in to the middle and lower left to make up for the one that couldn't be used.
i used two as these are radially further in to the axis of turning and will be exposed to higher leverage at that position than the other 3 out at normal position
overkill most probably yes.
but it all bolts up nice
Dave
- Attachments
-
- Jeep/dakota throw out fits like a glove
- 20190324_143748.jpg (94.9 KiB) Viewed 10633 times
-
- 20190324_145051.jpg (118.89 KiB) Viewed 10633 times
-
- 20190324_150151.jpg (88.18 KiB) Viewed 10633 times
-
- 20190324_150208.jpg (108.66 KiB) Viewed 10633 times
The Greater Knapweed near the Mugwort by the Buckthorn tree is dying
Re: Dave999's Aussie Charger
nice work dave, i'm all for the 'belt and braces' approach 
neil.
neil.
Re: Dave999's Aussie Charger
done nout on the car recently
but accidentally built this instead
its a mock up of a 3+2 speed mark 1 chopper
1975 warranty claim frame NOS
1970s 3 speed hub gear shell (sturmey archer) with its rusty guts ripped out and replaced with a 5 speed s5/2
built into 2.125 inch steel rim off a japanese bike designed for 12 g spokes so had to use spoke washers for the 14 g chopper spokes
built seat from ebay parts new steel base new foams new cover. copy US style High back rest didn't have acorn nuts so used front wheel R nuts
put on original front wheel
resprayed forks and chain guard
new mudguards
NOS sturmey Archer 3+2 console and shifter.....that cost more than the frame...
Original brakes
ribbed brake and gear cables
raleigh 20/shopper auto adjustable brakes.
makes a chopper nerd feel sick, its all right but its all wrong as well, but the impact on those who don't know is great
NOS Pifco lights
decent set of peddles
decent mk1 handlebar stem and headset
built it as a bike i would have built had i had a supermarket sweep opportunity through the back room of a raleigh dealership in 1984.
many thanks to those who have assisted with parts and advice over the years Steve/stu/dunc etc
i am now a 2 chopper man...and the ladies do like to have a go on this one. the other is a bit rusty
Dave
- Attachments
-
- 20190708_205413.jpg (98.05 KiB) Viewed 10595 times
-
- 20190708_205431.jpg (117.31 KiB) Viewed 10595 times
The Greater Knapweed near the Mugwort by the Buckthorn tree is dying
Re: Dave999's Aussie Charger
The seat is beyond epic...
Does nobody do grifters ?
Does nobody do grifters ?
"Cum homine de cane debeo congredi." Woof.
Current Charger status - "Working and awesome"
Current Charger status - "Working and awesome"
Re: Dave999's Aussie Charger
yes they do....
if you get the urge i've got some NOS brake cables and the little plastic sleeves that made bog stock raleigh brake levers into space aged grifter levers
I only did the choppers cos the cost of a Burner was much the same.... the idea was get a bike i can sling in the back of the charger to make getting to the beer and the toilet at the NATS an easy exercise. anyway that went out the window with the daft high back seat....
still a grown man on a kids bike is easier to carry off on a chopper........ if you are going to look ridiculous ( or as i prefer to call it , exceedingly cool) may as well do it on a bike that can remove your testicles with its gear lever fandango
In the grifter front if you got two twist grips i have enough sturmey archer s5/2 bits left... we could make a 5 speed one..... just to annoy any purists
i did toy with the idea of grifter forks and front wheel on this chopper. but 15 stone of me on it would have snapped the rear stays off the frame, it would have been wheelie fantastic for a short period of time
Dave
The Greater Knapweed near the Mugwort by the Buckthorn tree is dying
Re: Dave999's Aussie Charger
i also did this
time has become seriously limited so i concentrated on projects i could get done without getting dirty and having to tidy up afterwards
10 minute shere 30 minutes there
Goped Big Foot
new deck
new brakes
new hardware
New old stock Zenoah G2D (hard to find they ain't made any since 1994) i have a full tune up single ring high CR kit to go on...
BLaSt BillET spacer
ADA racing Billet clutch housing and high rev springs
ADA Racing billet engine mount with 3rd bearing support
ADA racing lockout and turn buckle
And a seat that i have not yet fitted
look at the dinky crank and piston
- Attachments
-
- 20190617_205657[1].jpg (82.91 KiB) Viewed 10582 times
-
- 20190708_205606.jpg (83.81 KiB) Viewed 10582 times
-
- 20190708_205622.jpg (101.71 KiB) Viewed 10582 times
-
- 20190708_205626.jpg (109.32 KiB) Viewed 10582 times
The Greater Knapweed near the Mugwort by the Buckthorn tree is dying
Re: Dave999's Aussie Charger
Aw thats awesome.
I too had the urge to recreate youth and replace my burner - i would have paid for it too i think - but alas - my 6ft3 frame is one laid-back seat post too tall ( besides, mk1 burners had huge wide seat posts).
I ended up buying a ‘haro’ 24” bmx - its cool ( for a grown up bike) - its a bmx frame with 24” wheels - but alas - i cant hurl it round a skatepark no more...
I can ride it backwards and ‘rock walk’ but thats about it. Age is a terrible thing...
"Cum homine de cane debeo congredi." Woof.
Current Charger status - "Working and awesome"
Current Charger status - "Working and awesome"