Back to Stock - 73 Challenger Rallye

Use this forum for all your builds in progress.

Moderator: Moderators

User avatar
TyreFryer
Posts: 3444
Joined: Sun Apr 18, 04 10:25 pm
Location: Leighton Buzzard

Back to Stock - 73 Challenger Rallye

Post by TyreFryer »

Image

I’ve owned my 1973 Challenger 4 Barrel Rallye for 10 years now and had an immense amount of fun with it. Apart from it being fairly practical for the odd trips further a-field to visit friends in Brighton and the Isle of Wight, returning almost 20 miles to the gallon, it’s seen service running two of my best friends to their wedding and of course the ubiquitous prom for my eldest son and his mates.

I attended the odd car show when I first owned it but to be honest, sitting in a field answering the same questions over and over again wasn’t my idea of a good day out, in 2003 that was all about to change.

I was due to drive my mate to his wedding in Brighton and two weeks before the due date, I started to have severe starting and running problems. I’d overhauled the original Carter Thermoquad a couple of years previously but it was playing up and I didn’t have time to mess around trying to sort it out. I took the plunge and ordered one of the then new, Holley Street Avenger carbs from Real Steel. This required an adaptor plate as I was still running the stock cast iron inlet and I had to buy a new Edelbrock chrome air filter as the original wouldn’t fit.

All the parts arrived in their typically brash US packaging and reading the blurb on the boxes about “bolt-on power”, I have to admit, sucked me in. The wedding came and went and I was still reading the boxes! At around this time I took a trip to Santa Pod for a RWYB day, this was the first time I’d been back to Santa Pod since I was about 14. What a day I had, I think I only managed a mid 16 second run but I’d found what I enjoyed doing most with the car, I was hooked. I started attending the Street Machine “Street Racer Sundays” on a regular basis, I wasn’t seriously expecting to go fast but was having fun and learning.

Next on the cards was an intake upgrade so I ordered an Edelbrock Air Gap RPM, a line lock was fitted, unobtrusive Auto Gauge tacho mounted on the steering column and then a Summit electric fuel system with regulator and gauge from Summit. As the Challenger was so straight, I was mindful that any upgrades I did had to be reversible and this was a condition I set myself.

After lots of fun and a few heartaches (buying tyres and wheels that wouldn’t fit, fitting new springs hoping that would make the tyres fit, changing cam followers at the NATs, having to file the Edelbrock intake to fit at 2am in the morning!) I managed to get the Challenger down to very low 14’s with full interior etc. and not having touched the engine or transmission. Not particularly fast compared to other members endeavours but I was pleased with it.

By this time I had come to the decision that I could have more fun if I didn’t have to worry about what I did to the car to make it go faster. So with a few quid in my back pocket due to a tax rebate courtesy of the Inland Revenue, (which I found out a year later I shouldn’t have had and had to pay back as my accountant had cocked up, doh!) I started to look around for something more appropriate to chop about. This resulted in me buying a fresh import courtesy of Duncan which was the Yellow Sport Satellite I had until last year and had an immense amount of fun with. But that’s another story.

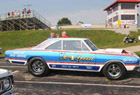
So while I was having fun with the Satellite the Challenger was stored away, coming out for the odd stand in at the 2005 NATs when the Satellite was undergoing work, (where it received a top 10 award, see pic above, I couldn't stop grinning, thanks Tony and Jim), but other than that, had very little use over the last 4 years. That was until my son’s Prom was looming last June and I knew the Challenger had a few jobs that needed sorting out.

And this is where this story begins…
Last edited by TyreFryer on Sun Mar 08, 09 2:14 pm, edited 1 time in total.
Martin Walker
Anonymous

Post by Anonymous »

Very sharp looking car that Martin. Nice one :thumbright:
User avatar
TyreFryer
Posts: 3444
Joined: Sun Apr 18, 04 10:25 pm
Location: Leighton Buzzard

Post by TyreFryer »

The engine had started smoking out of the lefthand exhaust, just under initial acceleration but it started to get worse. At first I thought it was burning a bit of oil but after further investigation it transpired that it was steam. If I held my hand over the end of the exhaust it would be covered in condensation, not oil. Also this phenomena didn’t disappear as the engine reached operating temperature.

I found no trace of oil in the water, water in the oil, or exhaust gases escaping from the radiator. A compression test showed 150 to 160 psi on all cylinders except 1 and 3, this was the side of course that was smoking. Cylinder 1 was only managing around 60 psi and cylinder 3 was showing just 0 to 10 psi! I “naturally” assumed this had to be the root of the problem. Removing the head revealed a split in the head gasket from the bore to the outside of the head above the exhaust manifold on cylinder 1 and a burnt out exhaust valve on cylinder 2. (Amazingly the Challenger had run a low 14 with the head in this condition).

A trip to Hausers and Jeff Hauser spending almost an hour with me, looking at the heads, ringing around for parts prices and seeing if they had any heads in stock in better condition, ended in Jeff recommending that I look for another pair of secondhand heads. My heads were going to need new valves, seats and guides throughout. The exhaust guides had already been re-sleeved once and the inlet guides had been knurled, lovely! It wasn’t going to be economically viable to have the work done on them.

After a bit of a search I obtained a pair of heads from Paulo Mangusta before the disastrous fire at his workshop occurred. These were stripped, checked cleaned up and the valve seats lapped in ready to go. New rockers and shafts were purchased from Hausers and everything was bolted back together the afternoon before the prom. A quick compression check and all cylinders were constant at 160 psi. I started her up and… a cloud of steam/smoke was still belching out the back of the car! On top of that the car was running worse than ever, it was down on power and this got worse as the revs got higher. It appeared that the bottom end couldn’t handle the new lease of life from the heads.

It was going to have to be a bottom end overhaul as well, so a gentle limp to the prom and back and the Challenger was laid up again while I sold the Satellite, before I knew it, it was the end of the year...
Last edited by TyreFryer on Mon Mar 09, 09 9:17 am, edited 4 times in total.
Martin Walker
Anonymous

Challenger

Post by Anonymous »

Keep it coming Martin you know i like your car anyway even though im normally biased towards a 70-71 at the outside yours is just so nicely original you cant not like it :thumbright:
bananaskin
Posts: 4745
Joined: Mon Sep 10, 07 4:00 pm
Location: Hertfordshire
Contact:

Post by bananaskin »

Keep the story coming Martin :thumbright:

Love your car ;) :thumbright:
<a href="http://s192.photobucket.com/albums/z238 ... banner.gif" target="_blank"><img src="http://i192.photobucket.com/albums/z238 ... banner.gif" border="0" alt="Photobucket"></a>

1970 Dodge Challenger 440-6
Move Over People Are Racing
James MMA/727
User avatar
TyreFryer
Posts: 3444
Joined: Sun Apr 18, 04 10:25 pm
Location: Leighton Buzzard

Post by TyreFryer »

Thanks guys, I'll try and post more pics and what I've been up to this weekend tomorrow night.
Martin Walker
User avatar
Derek
Posts: 7313
Joined: Sun Apr 18, 04 11:19 pm
Location: Surrey
Contact:

Post by Derek »

Martin, keep it coming, this is good reading :thumbright:
Are we there yet dad ..... 10 to the gallon but worth it.

MMA Public Relations Officer.
MMA South London and Surrey Area Rep.
Rich

Post by Rich »

TyreFryer wrote:Thanks guys, I'll try and post more pics and what I've been up to this weekend tomorrow night.
Keep it car related please,you are in the workshop..
User avatar
TyreFryer
Posts: 3444
Joined: Sun Apr 18, 04 10:25 pm
Location: Leighton Buzzard

Post by TyreFryer »

After a few delays due to other commitments I was finally ready to get started in earnest on the Challenger again at the beginning of March this year, Saturday March the 7th to be precise.

Image

Saturday morning was spent removing the radiator, fan, alternator, steering pump, carb, starter motor and other ancillaries from the engine bay. Over the years I had already removed the AC system and disconnected the heater etc. so progress was pretty swift. By Saturday afternoon the engine was ready to be lifted out of the car with just the top bellhousing bolt remaining finger tight. I’d left the headers loose either side of the engine as it was going to be easier to remove them when the engine was out. A quick trip over to Ivor’s to borrow his crane and I was all set to lift the engine out on Sunday morning.

Image

Sunday went surprisingly smoothly too thanks to assistance from Nathaniel, first the bonnet was removed and then the straps put in place, last bellhousing bolt out and the crane effortlessly lifted the engine up and forward. Of course the front of the car raised up quite a bit too once the weight of the engine was off of it. At full lift the engine needed another inch to clear the front of the car but this was achieved by getting Joshua to sit on the front of the car with Nathaniel!

Image

The rest of Sunday and the evenings during the following week were used to strip the engine down. This was completed on the following Saturday and I spent most of the second weekend measuring everything up to see what sort of wear there was.

The mains and big ends had been machined .010” under and the bores were +.030”. Bores measured a max of .001” to .002” taper and showed no wear other than needing a hone, same with the pistons. Crankshaft journals were also unworn however number 3 mains showed some pitting to the bearing where it looked like foreign material had come through the oil way. The camshaft bearing above this journal also had similar damage so they would need replacing too. Needless to say the oil pump showed signs of scratching and damaged to the rotors and the bottom of the housing, so this will be replaced. Though the timing sprockets showed no discernable wear, the chain was stretched and could be moved almost an inch from side to side. I had replaced the cam followers some years ago and the camshaft “looked” to be in pretty reasonable order, though the tip of the lobes were bright across their entire width. Measuring the lift on the lobes showed a different story. The book I’m using advised no more than .005” variation in the lift between lobes, I measured .019” variation on the inlets and .012” on the exhausts. As best as I could identify the cam it would appear to be the stock lift of .429/.444, albeit it was well worn below this. I had replaced the freeze plugs on the side of the block in situ a few years ago, but the rear core plug in the bellhousing was at the point of rusting right through, so I was just in time. Once again evidence that core plugs should ALWAYS be replaced when the opportunity arises. There was no oil slinger fitted behind the timing case, (maybe the reason the timing chain was so worn) I’m presuming there should be one on all 340s? And finally, one of the drain plugs on the side of the block didn’t want to come out, soon sorted with the fantastic Irwin nut removal sockets Stu and Gareth gave me at the NATs last year!

Other than the above, everything else was in tip top condition, it would appear that the only areas that need addressing are the areas that were overlooked the last time the engine was rebuilt. So my shopping list from Mancini Racing was drawn up as follows:

1. Michigan engine rebuild kit including Clevite mains and rod bearings, Sealed Power Moly rings and Felpro gasket set.
2. Mancini double roller timing chain and sprockets.
3. Oil slinger.
4. Stock oil pump. (From what I’ve read, I’m not going to need a high volume pump and the stock pump will create less stress on the intermediate shaft and less loss of HP).
5. Mopar oil filter.
6. Complete Mopar block hardware kit.
7. Comp Cams hydraulic High Energy cam and followers. Not sure yet whether to go for the .440” lift (1200-5200 rpm) or the .454” (1500-5500 rpm). Any suggestions on how these will perform with standard intake, Carter carb and iron exhaust manifolds? Will these be mild enough? Though I’m returning to stock I thought the car would benefit from a newer technology cam than the original MP cams, what do you reckon?
8. Camshaft bearings.
9. Set of Mopar intake manifold bolts (the original iron manifold is going back on).
10. Mopar iron exhaust manifold fitting kit (yes I collected a pair of original iron manifolds to go on too). These have the correct studs, nuts, bolts and conical washers.

(Any feedback/opinions/omissions on the above choices would be welcome).

I’m also going to treat myself to an oil pump priming shaft, an engine lifting plate and if I can stretch to it, a US (big) valve spring compressor.

Next my attention turned to the engine bay...

Image
Martin Walker
User avatar
Rogue Trooper
Posts: 1792
Joined: Wed Feb 01, 06 8:19 pm

Post by Rogue Trooper »

8-) Great write up :atthemovies:
1970 Charger 500
1934 Coupe
1954 F100
1972 Norton Commando Fastback

Your Mum Says Hi.

Mopar a God amongst insects.

Rule in Hell or be a Slave in Heaven.
Anonymous

Challenger

Post by Anonymous »

Martin i have the priming shaft for small blocks so no need to buy just borrow mine
User avatar
TyreFryer
Posts: 3444
Joined: Sun Apr 18, 04 10:25 pm
Location: Leighton Buzzard

Post by TyreFryer »

Thanks James, Keith.
Martin Walker
User avatar
TyreFryer
Posts: 3444
Joined: Sun Apr 18, 04 10:25 pm
Location: Leighton Buzzard

Post by TyreFryer »

The engine bay on the Challenger has always been the least tidy area of the car. The paint is the original from when the car was manufactured and it’s looking rather tired. So having removed the engine I was in the position to do something to rectify the situation. As I’ve previously mentioned, the plan is to return the engine and engine bay closer to stock, so again this can be pursued at this stage.

Image

Over the years I’ve collected the few parts that were missing from the car when I bought it. Most of these have not been fitted up until now but that is all about to change. These parts include among others, original iron exhaust manifolds with the warm air ducting and a rear windscreen defogger setup, as there is a button on the Rallye dashboard for this.

The Saturday following the weekend that I finished stripping and inspecting the engine, I made a start on the engine bay. First the steering linkage was dismantled to remove the Hedmann Headers. The car had headers fitted when I bought it and I did replace these with new headers, however I’m really glad these aren’t going back on.

Next the 727 transmission was removed and the next job was to remove the exhaust system. I replaced this about 9 years ago with a system made up by US Automotive in Bedford. These were still in great condition with only surface rust but unfortunately I couldn’t salvage them for somebody else to make use of, as I couldn’t get the pipes apart. They will be no use to me as I had to cut and weld different connections onto them for the headers so it’s time for a new stock system to accompany the iron manifolds. A couple of cutting disks on the angle grinder later and the car was free of them.

Back on top and it was onto the engine bay. First I took a lot of pictures of what was left in the engine bay, otherwise I was never going to remember where everything went. I’ve replaced all the wiring harnesses, battery cables and electronic ignition components with items from Year One and also a NOS battery tray, so much of it will be a case of cleaning up what I have. Standing in the engine bay and working around from left to right I soon had everything cleared except the brake servo and brake pipes. I ran out of time and Sunday was Mother’s Day so the rest would have to wait until the following weekend.

I’d like to treat the engine bay to all new air con and heater hoses (I’ve already replaced the radiator hoses etc), though these are looking to be surprisingly expensive for period correct items. I will also be ordering a complete body bumper kit for the car which will include all the rubber bumpers for the bonnet. The original hood wedges are still present and in good order.

As with the rest of the car there is no rust in the engine bay, just a lot of dirt and faded paint, so once the bay is completely stripped the plan is to give it a really good clean, prep it and paint it gloss black to match the rest of the car. While I’m at it I’ll paint the K frame at the same time.

Let’s hope we have good weather this weekend…
Martin Walker
User avatar
Ivor
Site Admin
Posts: 12998
Joined: Sun Apr 18, 04 11:11 pm
Location: The village of Evenley

Post by Ivor »

Top stuff Martin, you know my feelings as far as cam selection is concerned, I was really impressed with the accuracy of comp cams and cam profile technology has really moved on so I think the Chally could benefit from a little performance boost while retaining the original drivability.
The pump don’t work coz the vandals took the handles.

www.ivorsroadrunner.com
Anonymous

Post by Anonymous »

Good stuff Martin & a great read. :thumbright:

What's the comp ratio , 9:1? , a low comp motor will fair better with a tight lobe sep , around 108/110* , you can get the data from the cam company on what the vac figure should be for each cam , maybe you'll get a tad more reversion with the tighter lobe sep , but it will make more power & raise cylinder pressure , which is good news for low comp motors.

:thumbright:
Post Reply