I decided to repair my old MIG welder that has seen better days. When that was done i decided to weld up a few bits on the Challenger that I knew needed doing as soon as I removed the fenders.
Dave Robsons Challenger R/T
Moderator: Moderators
-
Dave-R

- Posts: 24751
- Joined: Sun Apr 18, 04 11:23 pm
- Location: Dave Robson lives in Geordieland
- Contact:
I was off work today due to being up all night with a bad stomach so this afternoon I dragged myself into the garage to see if there were any little jobs I could do to the car within running distance to the loo. 
I decided to repair my old MIG welder that has seen better days. When that was done i decided to weld up a few bits on the Challenger that I knew needed doing as soon as I removed the fenders.
I decided to repair my old MIG welder that has seen better days. When that was done i decided to weld up a few bits on the Challenger that I knew needed doing as soon as I removed the fenders.
- Attachments
-
- This bit at the back of it was loose too.
- IMG_0302.jpg (141.16 KiB) Viewed 8318 times
-
- The bottom of the inner fender was detatched from the chassis.
- IMG_0301.jpg (129.31 KiB) Viewed 8318 times
-
- The fender diagonal stay was detatched from this strip that ties it to the bulkhead
- IMG_0300.jpg (141.57 KiB) Viewed 8318 times
-
- The back end of the right inner fender was loose on the bulkhead.
- IMG_0299.jpg (111.03 KiB) Viewed 8318 times
-
Dave-R
- Posts: 24751
- Joined: Sun Apr 18, 04 11:23 pm
- Location: Dave Robson lives in Geordieland
- Contact:
well i started welding but I was out of practice so it was a bit rough until i got the settings right. Then it went rough again because the gas ran out!
Never mind. It got a good hold. I just dressed off the snotty bits. I'm not so proud as to hide my welding if it is not perfect. As long as it does the job and can't be seen when the car is complete.
The fender stay on the drivers side is very loose as well. I will weld that when I get more gas.
Never mind. It got a good hold. I just dressed off the snotty bits. I'm not so proud as to hide my welding if it is not perfect. As long as it does the job and can't be seen when the car is complete.
The fender stay on the drivers side is very loose as well. I will weld that when I get more gas.
- Attachments
-
- Still got this bit to weld.
- IMG_0305.jpg (127.42 KiB) Viewed 8312 times
-
- Bottom of inner fender welded.
- IMG_0318.jpg (143.87 KiB) Viewed 8312 times
-
- Top of inner fender and stay welded.
- IMG_0311.jpg (121.16 KiB) Viewed 8312 times
-
Dave-R
- Posts: 24751
- Joined: Sun Apr 18, 04 11:23 pm
- Location: Dave Robson lives in Geordieland
- Contact:
I got about 2 litres of loose rust out of the bulkhead before using a lot of rust converter. Once this welding is completed I am painting the cowl inside and out with acid etch primer and satin black paint (most Challenger R/Ts had the top of the cowl painted flat black) and then the inside will get a good coating of waxoil type stuff.
-
Dave-R
- Posts: 24751
- Joined: Sun Apr 18, 04 11:23 pm
- Location: Dave Robson lives in Geordieland
- Contact:
They are supposed to be welded. But before I bought the car that side had been impacted. The wing and bumper were destroyed. The grille and inner wing were damaged and the chassis rail bent.
The chassis and inner fender were straightened out. But the impact or straightening must have pulled the spot welds off. I only noticed when I took the fenders off after Matty painted the car.
I fixed the grille myself when I first got the car. The front bumper was replaced with a plastic copy. The wing was a used one from a metallic green car.
It is important to find any bits like this and repair them. They keep the body/chassis stiff and cut down on the creeks and squeeks.
-
Dave-R
- Posts: 24751
- Joined: Sun Apr 18, 04 11:23 pm
- Location: Dave Robson lives in Geordieland
- Contact:
That's odd because the other side of the car that has not seen damage is factory spot weled. Probably not very well but I tried shifting it and it is solid.MrNorm wrote:Actually my Challenger was not welded at the bottom like yours Dave (inner fender to chassis rail). I welded it up too!
I hear what you are saying about filling that seam inside the bulkhead. have no doubt that it will be completely filled with wax or similar.
I was thinking of adding more strength to the stays but once welded they seem pretty stiff as they are. I didn't have issues while they were loose so I don't think I will bother.
On the subject of rust converters.
The areas you see have been treated with Dinitrol RC900 "Converust Epoxy". if you go to the Frost website ( www.frost.co.uk ) then you should find the complete Dinitrol range.
The surface rust was taken off first with a wire brush before treatment. You can also get converters that leave a coat of zinc or something? POR products are also good.
But my plan is to just primer and paint inside and out before a good coat of Dinitrol cavity wax (again inside and out) on the bits you don't see when you pop the bonnet.
My garage is warm and dry with a de-humidifier going 24/7. It should keep rust at bay. It survived 7 years smashed standing in all weathers on a property in Texas before I got it restored the first time. Then it stood 16 years on my driveway in Newcastle.
I think it should fair a good deal better in the future.

Sounds like a good plan to me Dave!
In it's previous rusty life, I did use Dinitrol RC900 (under hood bracing, and other areas), POR-15 (both paint and Metal Ready), Jenolite, Smoothrite (painted a whole inner wing with that), Rust Eater, Zinc 182, Waxoyl, and probably others
Most of them had a good few years under their belt too, and seemed to keep rust at bay though I'm not sure any of them showed signs of chemically 'bonding' to the rust as some claim.
I think a well prepped surface with proper paint coverage is most of the battle, if you are going in hard to reach areas I reckon getting something that flows well is the best idea (I may use plain old engine oil when time comes to do m'sills). When I disassembled my bonnet I fould that the Dinitrol had really not flowed well (despite 'encouraging' it with my air gun!).
My experiences anyway, I reckon with the dehumidifier you will be well sorted Dave. What is the lowdown on that setup? cheap? expensive? easy to run and maintain?
(BTW, I'm sure that bottom panel was supposed to be welded, just typical shoddy Chrysler assembly techniques, they probably missed it or didn't bother! Mind you, the drivers side was also welded on mine)
Gavin Chisholm - 414ci W2 Stroker SmallBlock Panther Pink '71 Challenger convertible - in bits
Car progress can be viewed here
Car progress can be viewed here
I just looked at the photos where you are welding up your inner wing I had to pay attention to those areas on mine too. Be it right or wrong I presumed it was down to too much racing flexing the body as I had some cracks in other areas too but I know you don't race yours Dave. 
- Attachments
-
- Everything 224 (400 x 300).jpg (34.82 KiB) Viewed 8274 times
-
Dave-R
- Posts: 24751
- Joined: Sun Apr 18, 04 11:23 pm
- Location: Dave Robson lives in Geordieland
- Contact:
I think I can get right into all the bits I need to get into with the flexy bit attached to the air gun. It does help if you do this in warm conditions. I will be putting a couple of heaters on in the garage to get the place warm and also I will be running a hair drier inside the bulkhead to get the metal as warm as possible before starting.MrNorm wrote:When I disassembled my bonnet I fould that the Dinitrol had really not flowed well (despite 'encouraging' it with my air gun!).
My dad bought one after he had a leak in his house. Cost about £60 from B&Q with his over 65s Tuesday discount plus it was the last one of that model so he talked them down a bit more. He is good at that my Dad.I reckon with the dehumidifier you will be well sorted Dave. What is the lowdown on that setup? cheap? expensive? easy to run and maintain?
Once he had his place dried out he gave it to me. It works like a little fridge. Probably costs the same to run as a little fridge. It has a regulator on it like a fridge so you can set it to go off and on depending on how damp it is. During the summer it is hardly ever on. In the damp winter it runs a lot and pulls maybe 3 litres of water out of the air in a week?
The water is distilled water of course so you can find uses for it as well. Wor lass uses it in the big steam iron thing she has. The iron stays clean as a result and it is one of those little things that keeps woman happy.
-
Dave-R
- Posts: 24751
- Joined: Sun Apr 18, 04 11:23 pm
- Location: Dave Robson lives in Geordieland
- Contact:
Well tonight is my last night for posting on the board in general.
But I will still post the odd photo on here from time to time. Not answering any questions though. Probably post in the for sale/wanted ads too. But that will be all. I have a lot on this year.
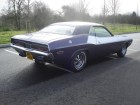
Here is the Chally as of tonight. Just started spraying some black radiator paint (not normal paint) on the radiator to improve the efficiency a bit but also because, as every 1970 Challenger owner knows, if you don't paint everything black behind the grille it looks awful when you look at the front of the car head-on.
But I will still post the odd photo on here from time to time. Not answering any questions though. Probably post in the for sale/wanted ads too. But that will be all. I have a lot on this year.
Here is the Chally as of tonight. Just started spraying some black radiator paint (not normal paint) on the radiator to improve the efficiency a bit but also because, as every 1970 Challenger owner knows, if you don't paint everything black behind the grille it looks awful when you look at the front of the car head-on.
- Attachments
-
- IMG_0672.jpg (122.77 KiB) Viewed 8338 times
Last edited by Dave-R on Thu Jan 04, 07 9:43 pm, edited 1 time in total.
-
Dave-R
- Posts: 24751
- Joined: Sun Apr 18, 04 11:23 pm
- Location: Dave Robson lives in Geordieland
- Contact:
Got my Christmas presents AT LAST! 
First of all yesterday I got a cheap 24ltr 8bar compressor. £80 from Screwfix.
Then today got my ceramic coated Dougs headers. 2-inch primaries and 3.5 inch collectors. Delivered to my door at a total cost (including postage and taxes) of £488.
Stick that up your TTIs.
First of all yesterday I got a cheap 24ltr 8bar compressor. £80 from Screwfix.
Then today got my ceramic coated Dougs headers. 2-inch primaries and 3.5 inch collectors. Delivered to my door at a total cost (including postage and taxes) of £488.
Stick that up your TTIs.
- Attachments
-
- IMG_0679.jpg (69.14 KiB) Viewed 8321 times
-
- IMG_0681.jpg (79.23 KiB) Viewed 8321 times
-
- IMG_0683.jpg (118.67 KiB) Viewed 8321 times
-
- IMG_0684.jpg (91.08 KiB) Viewed 8321 times
-
Dave-R
- Posts: 24751
- Joined: Sun Apr 18, 04 11:23 pm
- Location: Dave Robson lives in Geordieland
- Contact:
It is both center tubes on both sides of the engine. Typical for 2-inch primaries. The only thing i don't like about them is the collector reducers. They reduce from 3.5 inches to 2.5 inches. I want to run with 3 inch pipes from the collectors to the mufflers at least. Although I might reduce down to 2.5 inches for over the axle and back. But I have not decided yet.RobTwin wrote:surprised to see that good quality headers these days still need no.5 tube flattening for the spark plug
So if anyone has any 3.5-3.0 reducers for sale please let me know. Otherwise I can cut and weld these ones to some 3 inch pipe I have.
Dougs claim their headers are the best fit on the market.
But we will see.
The original "Headers by Doug" seems to have split up into two companies taking advantage of the name. Unless I am just confused? Not unusual for me.
These ones are called "The Original Dougs Headers" and the parent company is Pertronix.
Headers by Doug was the original drag racing header manufacturer. His products were always the best. So if the new owners have anything to do with Doug they will have to maintain a high standard.
-
Dave-R
- Posts: 24751
- Joined: Sun Apr 18, 04 11:23 pm
- Location: Dave Robson lives in Geordieland
- Contact:
From http://victorylibrary.com/mopar/header-tech-c.htm
One reason for becoming more interested in using 2-inch pipes after looking into it....
Another instance where a slightly larger pipe may help is where the departure angle of the pipe from the flange is very sharp (typically downward). The added cross-sectional area immediately after the flange apparently helps reduce the restrictive effect of a small radius after the port. This partially explains why some header models or brands work better than others with similar dimensions.
And as the pipes are a little larger than the ports...
If possible, slightly enlarge the inside of the flange opening in the header itself to produce a sharp step (be careful of grinding off the tube weld). Do not radius the edge. A 1/16” bevel is generally possible and will help. If there is not much room, don't grind all the way into the flange - a 45° angle is fine. This has a minor anti-reversion effect, helping to prevent back-flow at low engine speeds; helps clean up idle quality, etc.
And on the subject of a straighter exit from the port...
An easy way to effect a small increase in exhaust efficiency, if space permits, is to move the header out away from the port by 1/2” or more (using an extra gasket and longer studs or bolts). This moves the restrictive angle farther away from the port - every little bit helps here. It also reduces local exhaust port temperature in the head slightly. An easy spacer is an extra header flange or 2, but be sure that the transition from the extra flange to the header is not restricted. The extra flange may be slightly larger than the port opening in the head, but must not step down entering the header. Do not taper, blend, or bevel the extra flange to act as a transition between the port and the header.
-
Dave-R
- Posts: 24751
- Joined: Sun Apr 18, 04 11:23 pm
- Location: Dave Robson lives in Geordieland
- Contact:
Well the bulkhead is now finished apart from cleaning the rubber seal and pollishing off the rough edges where paint has ran under the masking tape as well as the overspray I seem to have all over the place!
Other jobs I have finished off is sorting out all the stainless bolts for the engine.
I got quite a few from Wil that have hex socket heads but then decided I wanted some of the bolts to match the stainless bolts I am using all around the engine bay such as the fender bolts so I bought some of them locally.
I used the hex head screws for the pulleys and timing cover. Also the alternator adjuster. I couldn't get a stainless bolt long enough for the top of the alternator to the head. So I just cleaned the original one up and sprayed a clear coat over the head so it looks like stainless.
Some of the bolts had to be cut shorter and more threads cut onto them.
- Attachments
-
- IMG_0779.jpg (119.33 KiB) Viewed 8349 times
-
- IMG_0715.jpg (108.32 KiB) Viewed 8349 times
-
- IMG_0716.jpg (110.36 KiB) Viewed 8349 times
-
- IMG_0757.jpg (76.97 KiB) Viewed 8349 times