1966 Charger 383 4bbl
Moderator: Moderators
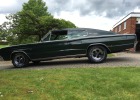
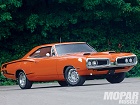
Not seen a red one. There's our green, two white ones on here, the blue one Dave Madders had for sale (that popped up on a Facebook group), there's a grey one coming up for sale soon in Herts. Any others around?cadboy wrote:Great read and yes nice charger.
I remember around 2003/4 there was a red 66 which was a lovely car and the owner took a liking to our newly purchased Chrysler Sebring convertible and was talking about a part exchange.
Well I was all for it but the wife was not as it was he new car
Love this thread!!! Its like we are all standing round it at the NATS talking about what you've done to her....just missing a beer or 3!
Great, detailed pics as well...makes all the difference!
I love everything as it is on her but Im a freak for originality
Cheers Steve
Great, detailed pics as well...makes all the difference!
I love everything as it is on her but Im a freak for originality
Cheers Steve
Bat Girl Stalker Living Petes Dream
Thanks. It's a shame it's just had a little welding done with repairs done to to front of the floor pan. I've just replaced the carpet set as that was beyond help.Steve wrote:Love this thread!!! Its like we are all standing round it at the NATS talking about what you've done to her....just missing a beer or 3!
Great, detailed pics as well...makes all the difference!
I love everything as it is on her but Im a freak for originality
Cheers Steve
An area of the car I knew needing addressing was the floor pan at the front at each side. I found broken window pieces under the rear drivers side seat, I'm presuming this happened sometime when the car was parked up from 90's-2000's letting water in which had soaked the carpet causing rust inside. The underside of the car is perfect! The car must have been parked nose down as there is very light surface rust on the floors mostly, with just concentrated areas at the front around the pedal area and near the kick panel on the passenger side. This was bugging me so I started digging.
With the aid of my ever trusty helper I got the 835853277 pieces of interior out of the car so I could see everywhere.
In doing so I decided the carpet was past it. You can see its torn, also the load area carpets had turned to dust from years of light through that huge back window.
I but the bullet and ordered a full carpet set from ACC in the states, they do the correct loop style and it comes moulded where it needs it and with the vinyl trims fitted where it has them. I just had to cut for the gear stick and console brackets and a bit of trimming at the edges. The carpet set looks like this for a 66/67 Charger. Mines black though.
In the meantime I was rubbing all the floors down as I wanted to give them a couple of layers of epoxy 2 pack paint so they would be better than new. Apart from previous mentioned areas they looked good. I also put on a coat of Fertan rust treatment previous to the paint.
I have a friend who restores cars as his business, mostly VW's, I asked him what he did and used. Inside there is a coat of the epoxy 2 pack, then seam sealer on the seams, then another coat of 2pack on top. This is between coats.
I did up to near the areas that needed work as I had another friend that offered to do the work for free but a little later on.
When that time came I bolted to drivers seat in, got up at 5am and had a noisy drive to Norfolk where we (he) got the bad cut out and new welded in. I had previously bought floor front repair panels ready.
Annoyingly the sections didn't come up far enough at the front. So he had to make pieces to fit. Luckily there was lots of spare metal as neither side used the full pieces. I forgot to get photos but the passenger side was a lot smaller area of about 6" square
I got the car home that evening and started prepping the areas for paint, grinding the welds down etc. I put a neat (no thinners) coat on all the welded areas, then three painted coats on the repaired areas and rest of front floor area so it had extra protection as this is the most used area for feet.
On the underside I did the same thing but added extra coats of 2 pack and on top I coated it in Dinitrol wax protection. In the near future I plan to remove the rest of the original under seal to inspect, clean and reprotect the rest of the underside.
I am a little annoyed that the car isn't 100% origonal as its had a bit of welding done now, but it thankfuly wasn't much and now I know the car it rock solid and lots of protection inside and out.
In the middle of all this was carpet time! This shows the difference in new on left and origonal on the right.
Trunk divider trimmed.
The hardest part was the load area as it bends down over a curved panel and has trims on the edges.
Load area and rear side sail panels in plus under window trim.
Rear seat side panels trimmed and in. I also fitted new plastic water protection sheets as the originals were bad.
While those rear panels were out I replaced any broken rear window rollers. So now they roll up and down a treat!
This is not fun! I've seen people mention they did theirs when the outer skin has been cut off for repair! Bit like this,
For the floor carpet I didn't think the underlay supplied was thick enough, so I bought a roll of extra from eBay and put this in so it's nice and comfy under foot.
This is the rear part of the floor going in,
Next the console started going back in, all pieces have carpet on them.
Rear seats finished, seat backs have carpet on the rears for when they are laid down to make the load area.
Front floor carpet in and cut around tunnel bits, pedal and light foot switch.
Console front in, I was waiting on the piece of carpet for this side as it was missing from the set, ACC were great to get one sent out asap.
Front seats back in. One day I'll get them re trimmed, but it's not a priority for now. The car is only having done what's needed to make it better and safe (suspension for eg), I want it to look as original as possible, so it's keeping its trims which have marks from its 50 years. The scrape on the rear fender is staying as is the faded through paint. I don't want a fresh painted car, I prefer the original (as possible).
Not long after the missing console piece arrived which I fitted in situ
- karlee1433
- Posts: 278
- Joined: Sun Jul 19, 15 4:27 pm
- Location: orsett essex / hornchurch
car
Looking great nice work
Harley Davidson 1340 evo 9 foot long swedish chopper.
Harley Davidson v rod screaming eagle
1970 dodge coronet super bee 383 4 speed manual
Also 1972 Suzuki gt750j nut &bolt restoration.
Harley Davidson v rod screaming eagle
1970 dodge coronet super bee 383 4 speed manual
Also 1972 Suzuki gt750j nut &bolt restoration.
Most on US eBay seem to be 14", there is a 15" set but they are only 6" wide.Blue wrote:None of my old catalogues list Spyders but they would have been available in a 7" and either 8" or 8.5" as these were common sizes back then.
Cost is an issue so although I like the Spyders best, they are probably out. I like the Keystones but would probably have to get new ones. Other wheels I like are CragerSS or Magnums, if I could get a 2nd set at reasonable cost this might be my best option.